Wednesday, July 30, 2008

VINTAGELICIOUS

Okay, Now i want to give a tutorial about VINTAGE TONE.. this is a very simple tutorial.. and i think, you have your own 'vintage' tone.. but, basicly it has a same way to get the tone.. but, i want to give you a tutorial on my way.. :)

Let's do the Tone..

TOOLS : I recommend Photoshop CS3 :D

Step 1 :

This is the first Image


Step 2 :
  • Duplicate the image twice (use ctrl+j twice), then, change the image mode, one into SCREEN one into SOFTLIGHT
  • Select Photo Filter>Yellow>OK
Then, you will produce this color..


Step 3:
Now, you have to play with COLOR BALANCE..
in my color, i use this setting..

click to enlarge..


That's the basic.. but, it's really depend on your image and your taste of color :) just be your self, i believe you have your own style.. :D

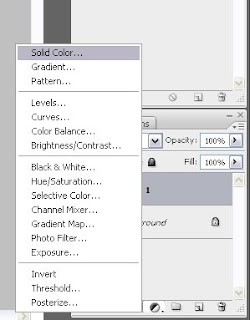
  • After you play with color balance, now i want you to SELECT SOLID COLOR, then please select the VERY DARK BLUE color in there.. if you confused what solid color is.. you can find here
  • After you cover the image with Dark Blue color, please change the mode into EXCLUSION, it will make your picture more vintage..
Then, you will produce this color..


Step 4:
Oke, now do the curving thing.. :), It's so hard to explain.. but i hope you understand with this image..

click to Enlarge


Okay, i will give a little explanation about this..

1st Curve :
All you have to do is just change the Line in Channel : RED, GREEN, and BLUE..
TOP RED : turn it down
BOTTOM RED :turn it up

and do the same thing with Green and Blue.. :)

2nd Curve :
Yeah.. i hope you understand the image.. you just play with the RGB Channel.. :)

Then You will Produce this Color..


Step 5 :

If you play with Curve, i recommend you to play with Selective Color and modify the color.. :)
you can modify it as you want.. but i recommend you to modify in : color : BLUE, YELLOW, WHITE, BLACK, and NEUTRAL. BUT.. it really depend on your image.. :) if your image has more RED, you can the selective color in red..

okay.. in this part, i produced this color..


..

Actually, this is not the finishing thing..you can modify as you want.. as you like.. maybe you want to add some texture.. or else.. or maybe BOKEH.. it's really depend on your taste.. :)
but the vintaging thing is over ..

if you want to make it sharper you can edit the image following STEP3 in this link

or maybe you want to make it more dimensional, you can edit the image following STEP3 in this link

OK! and this is my final touch.. :)


*blowkiss*


Love, nanath

Tuesday, July 29, 2008

MILKY TONE

Hello again! :) i'm nadia, now i wanna give you a tutorial about 'How to make a Milky Tone'. This might be a really simple Tutorial.. you can make a milky tone fastly! :)
ok! Let's begin the tutorial :)

Tool : PHOTOSHOP CS 3 IS A MUST

Step 1 :
This is The First Image Before i touch it! :)


Step 2:
Duplicate the image twice (use ctrl+j twice), then, change the image mode, one into SCREEN one into SOFTLIGHT.
Then, You will produce this color

then, Flatten Image

Step 3 :

  • Duplicate The Image
  • Filter>Noise>Reduce Noise(10 0 100 0)>OK!
  • Filter>Other>HighPass (Depend into your image, i recommend 1-2,8)>OK
  • Change The Image's Mode into LINEAR LIGHT
  • Flatten Image
Then You will produce this color (It's sharper than before!)

Then, Flatten Image ^_^

Step 4 :

Okayy!! Let's do THE MILKY THING.. :D
  • Duplicate The Image
  • Click SOLID COLOR
If you get confused about what Solid Color is, you can find it here!


  • Pick the color into WHITE (#FFFFF)
  • Change the Solid color Mode into SOFTLIGHT (You can play the Opacity as you want, i recommend you to change the fill opacity, it will make your picture softer)
  • Select SELECTIVE COLOR, then change the color above into White, then please turn the black one into left, (make it minus), and the Yellow one into right (make it plus) (you can play the color here as you like, and of course it really depend on your picture.
  • After you play with "WHITE COLOR", now you have to play with BLACK COLOR and NEUTRAL COLOR, still in SELECTIVE COLOR. But Remember, you only play in BLACK mode, you can turn in into left or right (make it minus or plus), it really depend on your picture.. :)
Then You will produce this Color..

then flatten image..

Now you already have a MILKY TONE!! you can modify your last milky tone with your really tone.. you can modify it as you want!

Oke, I modified my last milky tone, and i produce this color.. :)

click to enlarge it.. :)


Ok, For modification, i recommend you to use :
  1. Shadow/Highlite
  2. Curve
  3. Levels
See yaaaaaaaa... ^_^

Love, nanath

Thursday, July 24, 2008

COLORIZE WALL

Before i give you tutorial how to edit this photo, i would you to see my photo with this tone..
Click the link below this :
Gooday
Isn't Snake
Purpilias

Okay, we Start with the Tutorial..

TOOL : PHOTOSHOP CS3 IS A MUST

This is the first Photo before editting..

Step 1 :
I took this photo with Shutter Speed 1/40, F 5,6


Step 2 :


Secondly, you have to duplicate the image in Layer Options Twice (click ctrl+J Twice), then change one mode of picture into SCREEN, and another picture into SOFT LIGHT, then you will produce this color.


After That, please Flatten Image


Step 3 :
Okay, now we play with Shadow Highlight! I REALLY RECOMMEND YOU TO USE PHOTOSHOP CS 3 , why? because Shadow Highlight options doesn't exist in CS2. :)

Okay, in PSCS3, please click Adjustment>Image>Shadow/Highlight
believe me, this part is really depend to your taste.. !! you can play it as you want.. ! just believe in yout seld and get the "YOUR REAL COLOR" :)

and this is my S/H setting..
Shadow : Amount (59) - Tonal Width (35) - Radius (153)
HighLight : Amount(50) - Tonal Width(25) - Radius(57)
Adjustment : Color Correction(-100) - Midtone Contrast (23)

Then i produce this color!
After that, please Flatten Image ! :D


Step 4 :

LET'S PLAY WITH COLOR BALANCE!! yay! i really like this part.. but believe me, this is depend to your taste.. you can play color with your style!! you can make everything here! don't try to be somebody.. just be YOU!

1) Please click COLOR BALANCE OPTION, in this part, i make the color yellow dominant, and i give a little green and a little cyan, Don't forget to give a HIGHLIGHT touch in color balance option, i think it will make your picture a more colorful.. :)

ATTENTION!!
You don't have to be worry if you like wall color, but it doesn't match with the object (model), because in this part, i want you to 100% masking at the model area. remember! FULL MASKING! (if you don't understand what is it, it means, you have to erase the color balance area, and make it clear). You have to do this patiently, don't be rush.. do it neatly.. :)

2) after that, please fill the masking area with brush with OPACITY 30% in layer mask (but this part is really depend to your image, the opacity might be 25%,20%, etc)


yea, this is what i mean with LAYER MASK

this part really useful, to make the picture and the wall's color are blending

3) Use PHOTO FILTER to make the color more vibrant.. :D if you need to mask it, just mask it,.. mmpphh.. this is really depend on your taste of color! believe me :D
then, you will produce this kind of color


After that, please Flatten Image :D

Step 5 :
1) duplicate the image
2) select Filter>Noise>Reduce Noise (10,0,100,0) You have to set the option into this..
3) select Filter>Other>High Pass (2,8/2/1(depend into your picture)) Set The Picture Option into LINEAR LIGHT

This part is really useful for make your image sharper!!

Then, Flatten Image


Step 6 :
1) Give a Texture into your Image, for make the wall brighter and more vibrant! I recommend DEVIANTART <<< style="font-weight: bold;">OVERLAY, then mask the model part..
3) if you don't like the texture's color, you can change it with Color Balance, please select Image>Adjustment>Color Balance and you can change the texture color as you want!

okay, for my picture.. i produce this color..


Step 7 :
Now, please do DODGE/BURN
the key is! DODGE HIGHLIGHT IN HIGHLIGHT AREA, AND BURN MIDTONES IN SHADOW AREA.. Once again! this is about your taste, you can burn and dodge as you want, but don't do it TOO MUCH, okayy?

oh ya, if you feel your model (object) is too dark, you can give CURVE into it,
1) please Marquee the model with eliptical marquee
2) click right>feather>100/150
3) light the model with curve as you like

okay, now i produce this color..


Okay, That the last Process.. if you want to make the Picture better.. you can do as you like..
i can give you an option..

1. You can play color with Selective color
2. You can change the light with Render (filter>render>lighting effect)
3. You can add some flare with lens flare(filter>render>lens flare)
4. You can make your picture more vibrant with Photo Filter


That's All from me! HAVE FUN!!

my last photo

BEFORE


AFTER


Love, nanath

Introduction

Hello, my name is nanath. Actually, i'm just an amateur photographer and photoshoper. The reason why i made this blog, because.. maybe someday i'll get amnesia, then i forgot how to edit, so my friend gonna tell me, that i can edit photo.. and my memory will back! hahahah.. no, i'm joking! :D
The purpose is, i want to share my knowledge about editing, and i hope it will be useful for everybody..

firstly, im so sorry because my english is not very well, i just can say what i can say, if you don't understand.. hmm.. mybe u should ask me.. hehehe.. ^_^

so, i have a gallery in DeviantArt, if you wanna check my art, please come..
http://nanath.deviantart.com

thank you.. :)

Love, nanath