ok! Let's begin the tutorial :)
Tool : PHOTOSHOP CS 3 IS A MUST
Step 1 :
This is The First Image Before i touch it! :)

Step 2:
Duplicate the image twice (use ctrl+j twice), then, change the image mode, one into SCREEN one into SOFTLIGHT.
Then, You will produce this color

then, Flatten Image
Step 3 :
- Duplicate The Image
- Filter>Noise>Reduce Noise(10 0 100 0)>OK!
- Filter>Other>HighPass (Depend into your image, i recommend 1-2,8)>OK
- Change The Image's Mode into LINEAR LIGHT
- Flatten Image

Then, Flatten Image ^_^
Step 4 :
Okayy!! Let's do THE MILKY THING.. :D
- Duplicate The Image
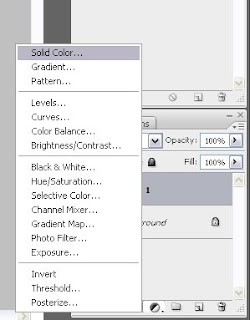
- Click SOLID COLOR

- Pick the color into WHITE (#FFFFF)
- Change the Solid color Mode into SOFTLIGHT (You can play the Opacity as you want, i recommend you to change the fill opacity, it will make your picture softer)
- Select SELECTIVE COLOR, then change the color above into White, then please turn the black one into left, (make it minus), and the Yellow one into right (make it plus) (you can play the color here as you like, and of course it really depend on your picture.
- After you play with "WHITE COLOR", now you have to play with BLACK COLOR and NEUTRAL COLOR, still in SELECTIVE COLOR. But Remember, you only play in BLACK mode, you can turn in into left or right (make it minus or plus), it really depend on your picture.. :)

then flatten image..
Now you already have a MILKY TONE!! you can modify your last milky tone with your really tone.. you can modify it as you want!
Oke, I modified my last milky tone, and i produce this color.. :)
click to enlarge it.. :)

Ok, For modification, i recommend you to use :
- Shadow/Highlite
- Curve
- Levels
Love, nanath


No comments:
Post a Comment